Table of Contents:
1. Introduction
2. The Foundation of your Winnipeg Garden's Pathway Landscape Design
- 2.1 Material Choices
- 2.2 Shape and Layout
- 2.3 Width and Texture
3. Incorporating Shrubs, Trees and Flowers
- 3.1 Selection of Plants
- 3.2 Plant Placement and Layering
- 3.3 Seasonal Considerations for Plantings
4. The Role of Landscape Lighting
- 4.1 Types of Landscape Lighting
- 4.2 Solar vs. Wired Options
- 4.3 Techniques for Effective Uplighting
5. Practical Considerations for Pathway Installation
- 5.1 Preparing for Installation
- 5.2 Ensuring Proper Drainage
- 5.3 Electrical Work and Safety
6. Yard Maintenance for Longevity
- 6.1 Upkeep of Pathways
- 6.2 Pruning and Health of Plants
- 6.3 Seasonal Maintenance Checklists
7. Enhancing Aesthetic Appeal
- 7.1 Decorative Elements
- 7.2 Color and Texture Coordination
- 7.3 Integrating the Pathway with Outdoor Living Spaces
8. Conclusion
1. Introduction:
Creating a beautiful outdoor space that seamlessly integrates landscape design and functionality can greatly enhance the appeal of any property. One of the most effective ways to achieve this is by incorporating a stone pathway surrounded by thoughtfully placed shrubs and trees, illuminated by artistic landscape lighting. Such designs not only provide practical access through the garden but also evoke a sense of tranquility and warmth, inviting homeowners and guests to slow down and appreciate the surrounding nature. A carefully designed pathway can serve as the backbone of your garden, guiding the eye from one area to another while highlighting key features and providing a safe, navigable route.
As you embark on this rewarding journey of designing a stone pathway, it is important to consider various factors, including material choices, layout, plant integration, and lighting options. This essay will explore each aspect in detail, providing expert guidance and practical tips to help you create an enchanting outdoor experience. From selecting the right plants to incorporating unique lighting solutions, this comprehensive guide aims to equip you with the knowledge and inspiration to design a stone pathway that harmonizes with the beauty of your yard, elevating it to a space of serenity and aesthetic pleasure.
2. The Foundation of Garden Pathway Design:
Creating a functional and visually appealing garden pathway begins with solid foundational elements. A well-designed pathway sets the tone for the entire landscape and influences how people interact with the outdoor space.
2.1 Material Choices:
The materials you choose for your stone pathway will significantly impact its appearance, durability, and feel. Natural stone provides an organic look that blends seamlessly with the landscape. Options include flagstone, slate, or river rocks, each offering different colors, textures, and patterns.
- Flagstone: This popular choice, known for its flat, random shapes, allows for flexible designs and natural transitions. It can create a rustic or elegant look, depending on the colors selected.
- Pavers: Concrete pavers can mimic the look of stone while offering a more uniform appearance. They are available in various colors and styles, making it easy to customize your pathway to match your home and garden.
- Gravel: Affordable and easy to install, gravel can be a great choice for a more relaxed, informal pathway. It can be used alone or combined with edging materials to create a defined, neat look.
Selecting the right material will depend on your desired aesthetic, budget, and maintenance preferences.
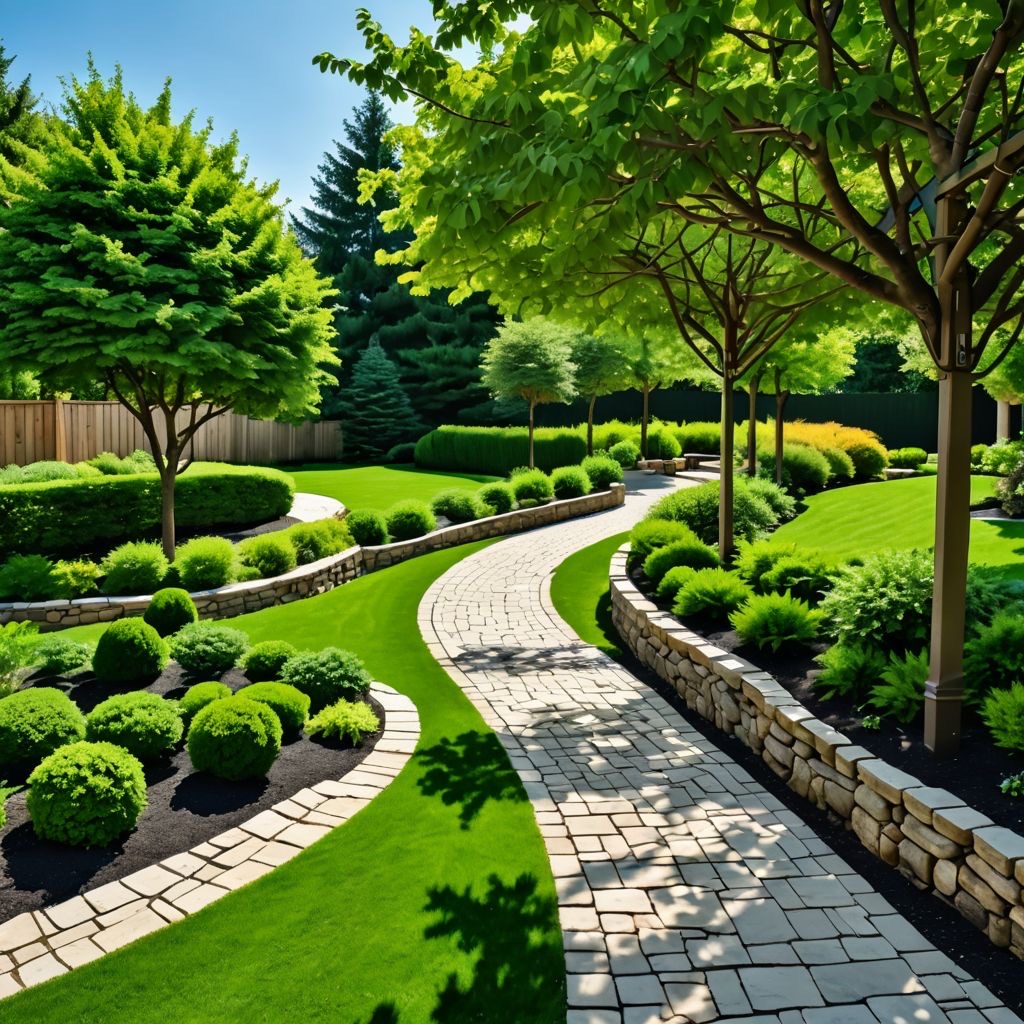
2.2 Shape and Layout
Another crucial element of pathway design is its shape and layout. Whether straight or curved, the design should flow naturally within the landscape.
- Curvilinear Paths: Winding paths generally feel more inviting and can lead visitors to various garden features, encouraging exploration and enhancing overall aesthetics.
- Straight Paths: These can offer a formal, structured approach, establishing sightlines to important garden elements like benches, fountains, or artwork.
When designing your pathway, consider integrating existing landscape features to enhance its natural flow. Use the terrain's contours and avoid overly steep grades to ensure safety and comfort while walking.
2.3 Width and Texture
The width of your pathway is vital for both functionality and visual appeal. Ideally, the pathway should be at least 3 to 4 feet wide to accommodate foot traffic comfortably. Paths intended for wheeled access, such as for wheelbarrows or strollers, should be wider.
Texture is equally important; incorporating varying stone sizes can create a more organic, less rigid look. You might also opt for textured stones to provide added grip, especially in wet weather conditions.
3. Incorporating Shrubs and Trees:
Once you have established a solid foundation for your stone pathway, the next step is to incorporate shrubs and trees that not only enhance the visual appeal but also create layers of interest.
3.1 Selection of Plants
The selection of plants is crucial in developing the character of your pathway. When choosing shrubs and trees, focus on varieties that thrive in your climate zone and soil conditions.
- Shrubs: Low-growing flowering shrubs can add color and texture along the pathway's edges. Consider choices like Boxwood, which provides a formal look, or Hydrangeas, known for their vibrant flowers. Lavender is an excellent option, providing fragrance and attracting pollinators.
Fragrance and pollinaors. A perfect combination!

- Trees: Small ornamental trees will add structure without overwhelming the space. Varieties such as Japanese Maples or Crape Myrtles can provide beautiful foliage and seasonal blooms.
3.2 Plant Placement and Layering
Arranging plants in layers enhances the visual flow along the pathway. Taller plants such as trees should be placed further back or alongside the path, while shorter shrubs should flank the edges. This stratified design not only ensures that no plant obstructs walking but also creates an enriching experience where various textures and colors can be appreciated at different heights.
Leave enough space between plants to prevent overcrowding, promoting healthy growth and reducing the need for excessive pruning.
3.3 Seasonal Considerations for Plantings
When planning your garden, it’s essential to choose plants that provide interest throughout the seasons. Selecting a mix of evergreens, flowering shrubs, and perennial plants guarantees year-round beauty.
Planting perennials, ensuring beauty blooms year after year

- Spring: Flowering bulbs like Daffodils and Tulips can provide early pops of color.
- Summer: Fragrant herbs or vibrant perennials such as Coneflowers can thrive during warmer months.
- Fall: Consider plants with autumnal foliage like Burning Bush or ornamental grasses that add texture while transitioning into autumn.
Ready to transform your Winnipeg yard with 10-best perennial suggestions?
Ornamental native grasses are a nice touch.

- Winter: Evergreens and plants with interesting bark, like Birch trees, can provide visual interest even in the colder months.
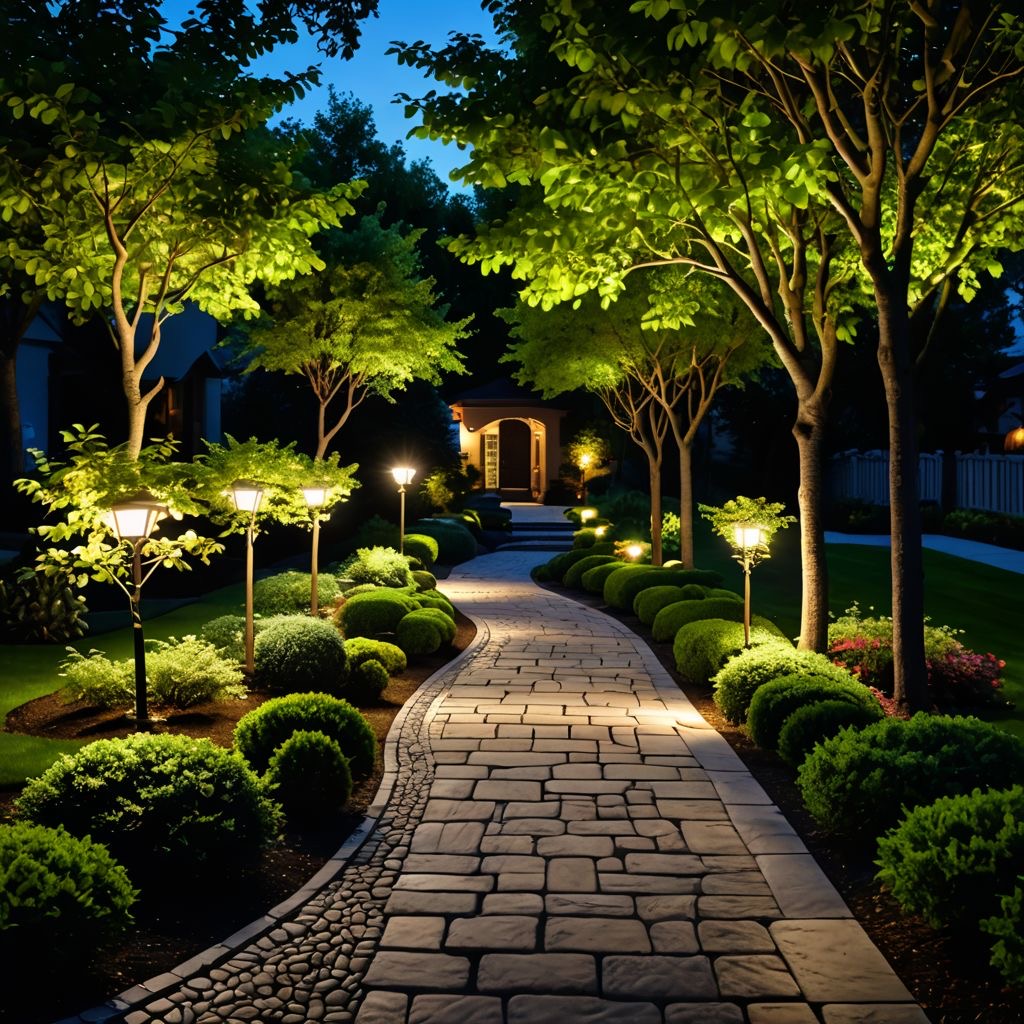
4. The Role of Landscape Lighting:
Implementing an effective landscape lighting plan is essential to ensuring that your stone pathway remains both functional and enticing after dark.
4.1 Types of Landscape Lighting
The right type of lighting can significantly enhance the atmosphere of your garden while highlighting the beauty of both the stone pathway and its surrounding plants.
- Path Lights: Designed to illuminate the edges of walkways, these fixtures come in various styles and heights. They provide necessary illumination for safety while adding a welcoming ambiance.
- Uplighting: This technique involves placing lights at the base of trees or large shrubs, effectively casting light upward and highlighting their canopies. This creates a dramatic effect and adds warmth to the landscape.
- Spotlights: Integrate spotlights to emphasize unique features such as sculptures, water features, or special planting areas along or adjacent to your pathway.
4.2 Solar vs. Wired Options
Choosing between solar-powered and wired landscape lighting depends on various factors, including budget, desired appearance, and installation preferences.
- Solar Lights: Eco-friendly and easy to install, these require no electrical wiring and can be moved easily. However, their effectiveness can diminish in shaded areas or during cloudy weather.
- Wired Lighting: While requiring a more involved installation process, these systems typically provide more consistent lighting and a broader range of decorative options.
4.3 Techniques for Effective Uplighting
When using uplighting, consider the angle and intensity to achieve the desired effect. Additionally, be mindful not to over-light, which can cause harsh contrasts and shadows.
- Focus on specific plants or features to create a captivating scene.
- Use multiple light sources to create a balanced look, ensuring the entire pathway and surrounding area are well-illuminated without appearing too industrial.
5. Practical Considerations for Pathway Installation:
A successful installation process is critical to creating a functional stone pathway. Investing time upfront in preparation will yield a more stable and visually appealing walkway.
5.1 Preparing for Installation
Before laying stones, clear the pathway area of debris, grass, and weeds. Consider marking the desired path with stakes and string to visualize the layout.
Make sure the ground is even and well-compacted to avoid settling or movement over time, which can cause safety hazards.
5.2 Ensuring Proper Drainage
Proper drainage is essential to maintain the integrity of the pathway and surrounding plants. A well-drained pathway will minimize puddling and erosion.
- Grading the Pathway: Grade the pathway to encourage water runoff away from the stones and the garden. A slight slope, ideally 1-2%, will help direct water away.
- Drainage Systems: Consider installing a French drain or gravel base to further enhance drainage.
5.3 Electrical Work and Safety
For wired lighting, always adhere to local electrical codes, and consider hiring a qualified electrician for installation. It is crucial to ensure safety in your outdoor space to prevent accidents stemming from excessive moisture or errant wires.
6. Yard Maintenance for Longevity:
Once your stone pathway, shrubs, and lighting are installed, regular maintenance becomes necessary to maintain the beauty and functionality of the space.
6.1 Upkeep of Pathways
Inspect your stone pathway frequently for any signs of wear or shifting stones.
- Cleaning: Remove debris and moss from the stones regularly, using a stiff brush and cleanser suitable for the materials used.
- Weeding: Prevent and remove weeds that may encroach on the edges or cracks in the pathway.
6.2 Pruning and Health of Plants
Regular pruning of shrubs and trees is essential for their health and visual appeal.
- Remove dead or diseased limbs, and shape plants as necessary to maintain a clean profile.
- Monitor for pest infestations and employ organic pest control methods when possible.
6.3 Seasonal Maintenance Checklists:
Create a seasonal checklist for maintenance to ensure all aspects of your pathway and garden are lovingly attended to throughout the year:
- Spring: Inspect lighting, prune back winter growth, and refresh mulch around garden beds.
- Summer: Water plants adequately, edge pathways, and monitor growth for necessary trimming.
- Fall: Clear away fallen leaves and prepare the garden for winter dormancy.
- Winter: Check lighting fixtures, especially solar options, and plan for any spring improvements.
7. Enhancing Aesthetic Appeal:
To elevate your stone pathway and surrounding garden to new heights of beauty, consider various aesthetic enhancements.
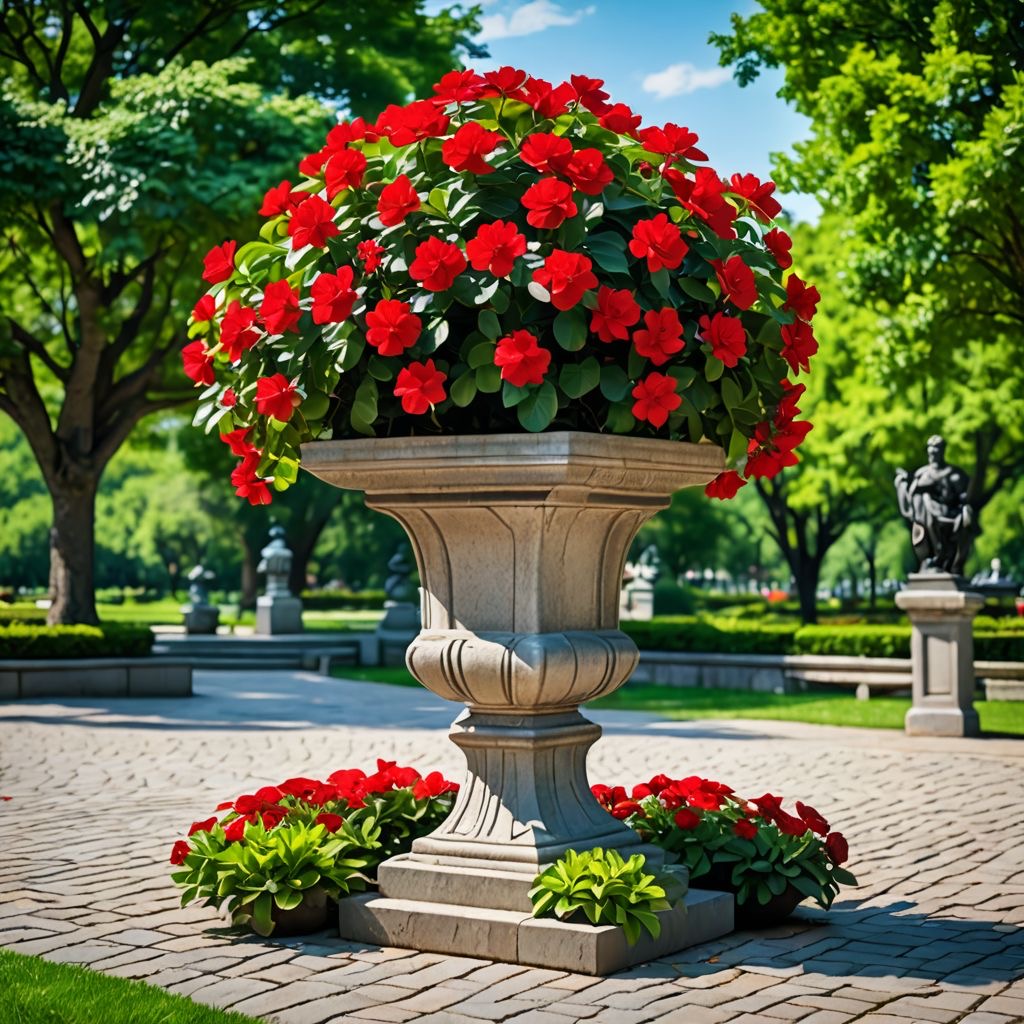
7.1 Decorative Elements
Adding decorative elements creates focal points and enriches the overall experience of the garden. Include features such as:
- Planters: Use decorative planters at intervals along the pathway. Seasonal flowers can offer bursts of color throughout the year.
- Garden Art: Include sculptures, wind chimes, or decorative stones that align with your overall theme. These elements can provoke curiosity and enrich the visitor experience.
- Benches: Incorporate seating areas along the path where visitors can pause and enjoy the surrounding beauty. Use benches made from natural materials to maintain a cohesive look.
7.2 Color and Texture Coordination
Consider the color palette and texture of both the pathway and the adjacent plants and features. Choose plants that either complement or contrast with the colors of the stone to create visual intrigue.
- Texture Variety: Balancing coarse and fine textures can create more dynamic composition. For example, combining broad-leaved shrubs with delicate flowers provides a pleasing contrast.
7.3 Integrating the Pathway with Outdoor Living Spaces
If your garden is adjacent to outdoor living areas such as patios or decks, create a cohesive transition between these spaces.
- Extension of Pathway: Consider extending the pathway to connect with these spaces, guiding foot traffic smoothly.
- Shared Elements: Use similar materials, colors, or styles of furnishings in both outdoor living areas and the garden to create a harmonious flow throughout your property.
8. Conclusion:
Designing a stone pathway framed by shrubs and trees, brought to life with landscape lighting, is a fulfilling endeavor that enhances both the beauty and functionality of your outdoor space. As explored throughout this comprehensive guide, the journey begins with foundational elements, followed by thoughtful incorporation of plants, effective lighting solutions, and meticulous maintenance practices. Through careful selection, strategic design, and consistent upkeep, your stone pathway can evolve into a serene place of reflection and enjoyment.
As seasons shift, this pathway will not only serve as a functional route through your garden but also as a beautifully illuminated backdrop for memorable gatherings, quiet moments, or leisurely strolls. The harmony between the natural elements—the stones, the flora, and the light—will foster an inviting atmosphere that encourages appreciation for the beauty of the outdoors.
Ultimately, investing time and resources into creating a thoughtfully designed stone pathway enriches your home and becomes a long-lasting source of joy, tranquility, and connection to nature. Through every step of this journey, you can cultivate a stunning outdoor sanctuary that reflects your personal style and welcomes others into a peaceful escape. Whether you are celebrating with family and friends or seeking solace amidst your plants, a well-designed outdoor space will elevate your experience, bringing years of enjoyment and inspiration.

If you choose not to go the DIY route and would like to talk to us at Sunshine about your project, we would be thrilled to work with you.
**Cautionary Note** on Landscaping in Winnipeg:
As you embark on your landscaping journey in Winnipeg, it's crucial to recognize the importance of understanding local regulations and permits before you dig in. The city of Winnipeg has specific guidelines and requirements that govern landscaping projects, and navigating these rules can be a daunting task for even the most enthusiastic DIY homeowner. This cautionary advice aims to provide insight into what projects may require a permit, the potential frustration of the permitting process, and why hiring a professional landscape contractor may ultimately be your best option.
Examples of Projects That Require Permits:
In Winnipeg, various landscaping projects necessitate specific permits from the city to ensure safety, environmental compliance, and aesthetic harmony. Common projects requiring permits include:
1. Major Grading or Site Alterations: If your landscaping plans involve changing the land's topography, such as extensive grading or earth moving, you will likely need a permit.
2. Retaining Walls: Building walls that exceed a particular height (generally over 1 meter) falls under regulations, as improper construction could lead to soil erosion or drainage issues.
3. Decks and Patios: Constructing a deck or patio that is freestanding or attached to a structure may require a permit, especially if it alters any designated utility easements. Decks that are designed to be more than 24 inches above the ground require a permit.
4. Fencing: While smaller fences and “Permitted Fences may often be constructed without a permit, taller structures or those placed along property lines might need approval.
5. Water Features: Ponds, swimming pools, or significantly sized water features typically require permits to ensure they meet municipal safety standards.
6. Planting Trees: In some cases, planting trees within specific distances from utility lines or property lines requires a permit, particularly for larger species.
7. In Winnipeg, whether you need a permit for constructing a gazebo or pergola typically depends on a few factors, including the size, height, and style of the structure, as well as its intended use.
Gazebos
- Permits Required:
Generally, a gazebo that exceeds a certain height (often around 1 meter or 3.28 feet) or has a foundation may require a building permit. If it is considered a permanent structure and is within proximity to property lines or utility easements, you will likely need to seek approval from the City.
- Permits Probably Not Required: Smaller, portable gazebos or those that are less than a specific height (check local regulations for exact specifications) may not require a permit.
Pergolas
- Permits Required: Similar to gazebos, larger pergolas, especially those that are attached to a house or exceed height limits, may necessitate a permit. If they involve electrical work for lighting or fans, permits will also likely be required.
- Permits Probably Not Required: Smaller, freestanding pergolas often do not require permits, as long as they comply with local zoning regulations.
Projects That May Not Require Permits
On the flip side, many landscaping projects can be undertaken without the need for city permits. These include:
- Planting annual or perennial gardens
- Installing small-scale decorative features like bird baths or planters
- Adding mulch or gravel to garden beds
- Minor repairs or modifications to existing landscapes (dependent on local regulations)
Changes in Regulations:
It is essential to bear in mind that regulations and codes can and do, change over time. What may have been permissible last year could be subject to new rules today. For this reason, the best practice is to always check with the City of Winnipeg’s Planning, Property and Development Department before commencing any landscaping project, regardless of its scale. Up-to-date information can save you from potential fines or the need to redo work that doesn’t meet current standards.
Consider Hiring a Professional:
While the allure of a DIY project can be strong, it's important to acknowledge the intricacies involved in complying with city regulations. The permitting process can be time-consuming and frustrating, often leading to delays in your landscaping plans. Understanding the nuances of local laws, submitting the necessary documentation, and ensuring compliance can swallow up valuable time and resources.
By hiring a professional landscape contractor with expertise in Winnipeg's regulations, you not only expedite the process but also gain invaluable knowledge and experience that can enhance the quality of your project. Professionals often have established relationships with city officials and are familiar with the permitting process, thus minimizing potential hiccups along the way.
In conclusion, while landscaping can be an exciting and fulfilling endeavor, it requires careful consideration of local regulations and permits.
Always consult the city before starting any project, and consider the long-term benefits of hiring a knowledgeable professional familiar with local regulations to navigate these complexities for you.