This image created by Sunshine Maintenance & Landscaping. Reproduction permitted with a link back to this article
Snapshot:
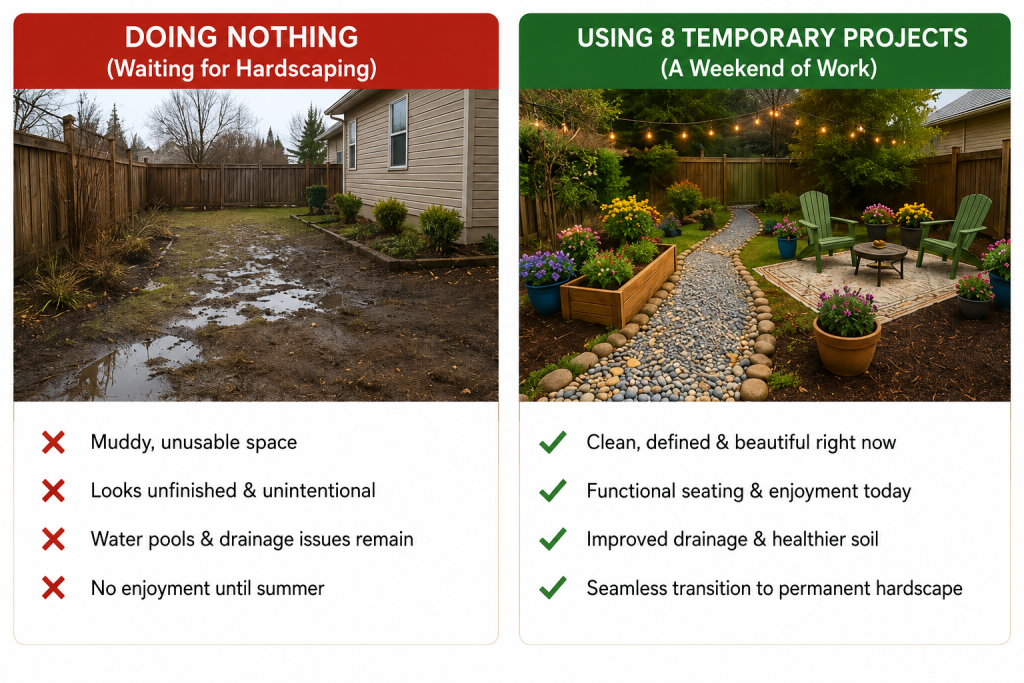
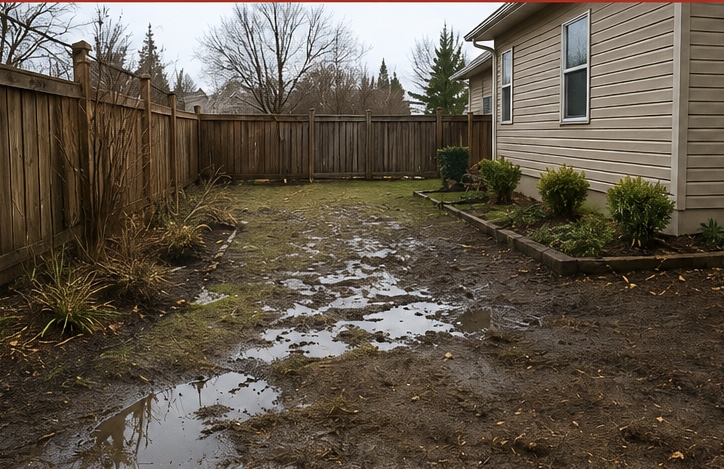
- Winnipeg's cold 2026 spring has delayed patios, concrete work, and major excavation. Your yard may look like a mud pit while you wait for ideal hardscaping conditions.
- The solution: You do not have to live with an unfinished yard. These eight projects work in cool, damp conditions right now, and will not need to be torn out when your permanent hardscape is installed.
- The bottom line: You can have a yard that feels finished, colourful, and usable this weekend, even if your big hardscaping projects are still weeks away.
Table of Contents
1. Introduction: 8 Temporary Winnipeg Landscape Projects for our Cool 2026 Spring
2. Define Your Future Patio Area with Temporary Ground Cover
3. Build Temporary Raised Garden Beds (That Become Permanent)
4. Create a "Dry Creek" That Looks Like Design (Not a Drainage Problem)
5. Install a Temporary Gravel Path Where Your Permanent Walkway Will Go
6. Plant "Temporary" Annuals in Key Sight Lines
7. Edge and Mulch Everything That Will Stay
8. Build a Simple Seating Area with Movable Elements
9. Fix One Drainage Spot Entirely (As a Trial Run for Full Grading)
10. What NOT to Do While You Wait
11. When to Stop Waiting and Hire a Professional
12. Why Our Customers Love Sunshine
13. Areas in and Around Winnipeg That We Service
14. Our Blog Articles
15. Questions our Customers are Asking
16. Conclusion: Your Yard Can Feel Finished This Weekend
1. Introduction: Winnipeg's cold 2026 spring has delayed patios, concrete work, and major excavation, however, you can certainly wait for Hardscaping Without Living in a Mud Pit
If you read our guide to landscaping after Winnipeg's cold 2026 spring, you already know the hard truth: some projects—large patios, concrete work, major excavation—should wait for drier, warmer soil.
But waiting does not mean living with a yard that looks unfinished, muddy, or frustrating.
This article is for homeowners who want their outdoor space to feel intentional, colourful, and usable right now—even if the big hardscaping projects are still weeks away.
We focused on eight categories of work that:
Work in current cool, damp conditions and can be done in a weekend
Will not need to be torn out when your patio or retaining wall is finally installed
Actually improve the soil and site for future work
Think of this as the softscaping companion to our hardscaping guide.
Before You Start: Two Rules for Temporary Landscaping
Rule #1: Do not block future work.
If you know exactly where your patio, walkway, or retaining wall will go, keep that area clear. Temporary improvements should go around future hardscape zones, not inside them.
Rule #2: Use this waiting period as site preparation.
Everything you do now, improving soil, marking drainage patterns, establishing beds—makes your future hardscape project faster and cheaper.
With those rules in mind, here are eight things you can do right now.
Contact us today to arrange your Free consultation.
Need a helping hand with your landscaping project? join our hundreds of happy Sunshine Maintenance & Landscaping customers!
2. Define Your Future Patio Area with Temporary Ground Cover
You cannot pour concrete or lay pavers yet. But you can mark exactly where your patio will go and make that area look deliberate.
What to do:
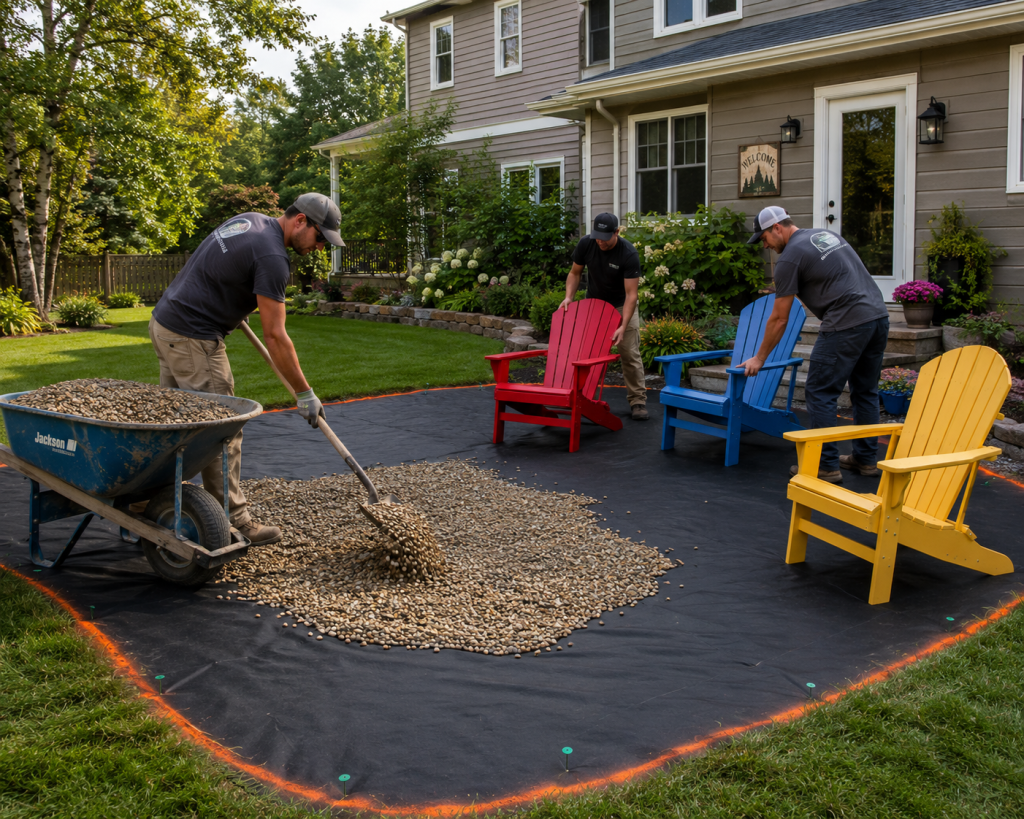
- Outline the future patio footprint with landscape fabric pinned in place
- Cover the fabric with a thin layer of washed gravel, pea stone, or wood chips
- Add temporary seating (Adirondack chairs, a bistro set, or plastic stackable chairs)
Why this works:
- The area looks intentional rather than like "mud we are ignoring"
- Gravel or wood chips suppress weeds and reduce mud tracking into your house
- You can still remove everything easily when the real patio installation begins
- Walking on the area now actually helps settle the soil (mildly beneficial)
What to avoid:
- Do not pour a temporary concrete pad (removal is expensive)
- Do not install expensive pavers that will need to be relayed
- Do not use decorative stone you plan to keep (it will get mixed into excavation)
Estimated cost:
$70–150 for fabric and gravel/wood chips
Why Does Your Winnipeg Grass Wake up at Different Times Every Sring?
3. Build Temporary Raised Garden Beds (That Become Permanent)
Reliable & Affordable Planting Bed Construction
Raised garden beds are one of the few projects that work beautifully in cool spring conditions and transition seamlessly into a finished landscape.
What to do:
- Build simple beds using untreated cedar, galvanized metal, or concrete blocks
- Fill with a 50/50 blend of topsoil and compost
- Plant cool-season annuals (pansies, snapdragons, calendula) or cold-tolerant vegetables (lettuce, kale, peas)
Best Annual Flowers For Winnipeg Summers: A Complete Guide
Why this works:
- Beds can stay exactly where they are after your hardscape is finished
- They add colour and structure immediately
- Cool soil temperatures actually benefit early plantings
- You are building soil quality while you wait
Positioning tip:
Place temporary beds away from future hardscape zones. Use them to define the opposite side of your yard, creating balance while the patio area waits its turn.
Estimated cost:
$150–300 per bed (depending on size and materials)
4. Create a "Dry Creek" That Looks Like Design (Not a Drainage Problem)
Wet springs reveal where water flows across your yard. Instead of fighting that water or staring at muddy rivulets, turn the problem into a design feature.
What to do:
- Use a shovel to define a shallow, meandering path where water naturally flows
- Line the path with landscape fabric
- Fill with river rock or 1–2 inch rounded stone
- Add a few larger boulders at bends for visual interest
Why this works:
- A dry creek looks intentional, professional, and beautiful
- It actually solves minor drainage issues while you wait for full grading
- It adds permanent value (most dry creeks stay after hardscaping is complete)
- You can install it entirely by hand in a weekend
What a dry creek should NOT be:
- A substitute for proper French drains on severe water problems
- Placed directly against your foundation (downspouts still need extensions)
- Dug so deep that you hit clay and create a pond
Estimated cost:
$100–400 depending on length (stone is the main expense)
5. Install a Temporary Gravel Path Where Your Permanent Walkway Will Go
You cannot install your beautiful paver walkway yet. But you can install a path that prevents mud, defines traffic flow, and becomes the base for your future walkway.
What to do:
- Outline your future walkway with marking paint or string
- Dig down 2–3 inches (not the full 8–12 inches required for pavers)
- Lay landscape fabric
- Fill with 3/4 crush gravel or limestone screening
- Compact lightly with a hand tamper
Why this works:
When your permanent walkway is ready, this temporary path becomes your base layer (you simply add more gravel, screed sand, and pavers on top)
Nothing is wasted
You have a dry, mud-free path immediately
The gravel helps identify any drainage issues before your expensive pavers arrive
Cost savings note: If you use the same gravel supplier for both temporary and permanent work, you can order the full amount now and store the excess for later.
Estimated cost:
$100–200 (mostly gravel)
6. Plant "Temporary" Annuals in Key Sight Lines
You may be waiting to install permanent shrubs and perennials until after hardscaping is complete. But bare soil looks unfinished. The solution: inexpensive annual flowers planted in containers or small temporary beds.
What to do:
- Focus on high-visibility areas: front entrance, back door, corners of the future patio zone, along temporary paths
- Use inexpensive annuals: marigolds, petunias, alyssum, nasturtiums, calendula
- Plant directly into inexpensive plastic pots that can be moved later
Why this works:
- Annuals cost very little ($50–100 transforms most small yards)
- They provide immediate colour and a "finished" feeling
- They can be moved, composted, or transplanted when hardscaping begins
- Cool spring weather is actually ideal for many annuals (pansies, snapdragons, calendula love these conditions)
Strategic tip:
Place annuals exactly where you eventually want permanent plantings. You are essentially "test-driving" your future garden layout.
Estimated cost: $100–150
Annuals vs Perennials in your Winnipeg Garden Design
7. Edge and Mulch Everything That Will Stay
You may not know exactly where every bed will end up after hardscaping. But you can edge and mulch the beds you are certain will remain.
What to do:
- Identify beds that are outside your future hardscape zones (foundation beds, fence lines, property boundaries)
- Cut clean edges using a flat spade or powered edger
- Apply 2–3 inches of cedar or hardwood mulch
- Do not mulch up to tree trunks or house siding (leave 2–3 inches of bare soil)
Why this works:
- Mulched beds look finished instantly
- Mulch suppresses weeds (reducing work later)
- Mulch improves soil moisture and temperature (benefiting future plants)
- Clean edges tell the eye that someone cares about this yard, even if the patio is delayed
What to skip:
- Do not install permanent landscape fabric or plastic edging in areas that might be disturbed by future excavation.
Estimated cost: $50–150 per bed (depending on size)
Reach out by call or text: 204-229-9789 or click here to submit your information to arrange a “no obligation” introductory phone call. We look forward to helping you transform your property.
Sunshine delivers professional, insured, and affordable lawn garden & landscaping services with fast, no-obligation quotes and dependable local service. No pressure. Just honest advice.
8. Build a Simple Seating Area with Movable Elements
You want to sit in your yard. Your future patio is weeks away. The solution is not to suffer indoors—it is to build a temporary seating zone that can be picked up and moved.
What to do:
- Choose a flat, dry area of lawn or gravel (not your future patio zone)
- Add a simple outdoor rug (weather-resistant polypropylene)
- Place movable furniture: Adirondack chairs, a folding bistro table, stackable resin chairs
- Add a few potted plants around the perimeter
- String temporary outdoor lights (battery-powered or plugged into an exterior outlet)
Why this works:
- Everything can be moved in 15 minutes when your real patio is ready
- You are using your yard now instead of waiting
- Outdoor rugs protect furniture from mud and damp ground
- The investment (furniture, rug, lights) all transfers to your finished patio later
What not to do:
- Do not build a temporary wood deck or platform. Removal will feel like punishment.
Estimated cost:
$200–500 (varies wildly based on furniture you already own vs. buy new)
9. Fix One Drainage Spot Entirely (As a Trial Run for Full Grading)
Your landscaping article explains when to delay major drainage work. But minor drainage fixes? You can do those today.
What to do:
- Identify the single worst wet spot in your yard
- Dig a shallow trench (4–6 inches deep) from that spot to a lower area
- Line with landscape fabric
- Fill with 3/4 crush gravel
- Cover with 1–2 inches of topsoil if the area is lawn, or leave exposed as a dry creek feature if it is a bed
Why this works:
- You learn how water behaves on your property before paying for whole-yard grading
- You might solve 80% of the problem with 20% of the effort
- Even if you eventually hire professional grading, this fix remains useful
- The sense of progress is valuable on its own
When to call a professional instead: If the wet spot is against your foundation, involves standing water for days, or requires a sump pump or French drain. Those are not weekend DIY fixes.
Estimated cost: $50–100
Sunshine Maintenance & Landscaping Winnipeg Case Study: Drainage
10. What NOT to Do While You Wait
- Pour a cheap concrete pad as a "temporary patio"
Removal costs more than the pour. You will regret it.
- Install cheap plastic edging you will hate later
Permanent edging is cheap enough to do right once.
- Plant expensive perennials exactly where excavators will dig
You will watch them get crushed.
- Lay sod in the area scheduled for grading
Sod is expensive to tear up.
- Build a wood platform or deck you cannot move
Temporary becomes permanent becomes problem.
11. When to Stop Waiting and Hire a Professional
The eight projects above are all DIY-friendly. But if you look at your yard and feel overwhelmed—or if the wet spring revealed bigger problems than you expected—there is no shame in bringing in help.
Signs you should call Sunshine Maintenance & Landscaping:
- Standing water stays for more than 24 hours after rain
- You have tried temporary fixes and the problem remains
- Your yard needs grading, not just a dry creek
- You want someone to design a permanent plan while you enjoy temporary fixes
- You simply do not have the time or physical ability for DIY
12. Why Our Customers Love Sunshine
When you need lawn care, garden care, snow removal or landscaping services in Winnipeg, here's why homeowners across the city trust Sunshine: we tailor every project to Winnipeg's unique climate and your property's specific needs. We deliver:
- Reliable scheduling – We show up when promised, rain or shine.
- Fully trained and professional crews.
- Affordable, transparent pricing – No hidden fees or last-minute surprises.
- Local experience with Winnipeg conditions
- Fully insured – Your peace of mind matters.
We treat every property like it’s our own – with care, attention to detail, and pride in the finished result.
✅ Click the links below for more information about Sunshine being recognized as Best in Winnipeg.
✅ Recognized as a "Best in Winnipeg" Landscaping contractor
✅ bestinwinnipeg.com/best-lawn-


Click here to visit Sunshine's homepage
What Our Customers Are Saying
“Sunshine does a great job. I highly recommend Sunshine!”
— Jason K. ⭐⭐⭐⭐⭐
“Sunshine Maintenance does a wonderful job on my property. It has never looked so great! Fair prices as well.”
— Vic C. ⭐⭐⭐⭐⭐
13. Areas in and Around Winnipeg Sunshine Services
Winnipeg and throughout the surrounding region, including:
|
Winnipeg Neighbourhoods |
Surrounding Communities |
|---|---|
|
St. Vital |
East St. Paul |
|
River Heights |
West St. Paul |
|
Transcona |
Headingley |
|
Bridgwater |
Oak Bluff |
|
Linden Woods |
La Salle |
|
Sage Creek |
Niverville |
|
South Pointe |
Selkirk |
No matter where your property is located, professional lawn care, garden care and landscaping in Winnipeg starts with one call to Sunshine.
Bringing Sunshine Maintenance Service to Your Doorstep in Winnipeg and All Neighbouring Areas
Not sure if we serve your area? Contact us and we will let you know within two business days.
We're in your neighbourhood and we're ready to help with no-cost no-obligation free quotes
14. Related Blog Articles We Hope You'll Find Useful
9 Affordable Ideas & Tips for Winnipeg Landscaping
Your Winnipeg Landscape Design & Build Guide for 2026
Tips on Transitioning Your Yard From Winter to Spring
Sunshine Maintenance & Landscaping Hardscape Experts Present a Winnipeg Hardscaping Case Study
15. Questions our Customers are Asking
Q1: Will temporary gravel or wood chips damage my soil and make future hardscaping harder?
A: No—if you do it correctly. The key is using landscape fabric as a barrier between the temporary ground cover and your soil. Without fabric, gravel can work its way into clay soil over time, creating a mixed layer that complicates future excavation. With fabric, the temporary cover lifts away cleanly, leaving your soil exactly as it was. Wood chips are more forgiving (they can be tilled in as organic matter), but fabric is still recommended. One caution: avoid rubber mulch entirely. It does not break down, becomes a disposal problem, and offers no benefit to your soil.
Q2: I have heavy clay soil that stays wet for days. Can I still do any of these projects?
A: Yes, but you need to adjust your expectations. Heavy clay is the most challenging Winnipeg soil type for any landscaping. For Project #4 (dry creek), dig shallower than you would in sandy soil—6 inches maximum—and line with extra-heavy landscape fabric. For Project #5 (temporary path), use a thicker gravel layer (4 inches minimum) to keep foot traffic above the mud. Skip any project that requires compaction on wet clay—you will only create a harder drainage problem. The best use of your time on heavy clay? Project #9 (fix one drainage spot). Digging a test trench on clay tells you more about your property than any other single action. If water sits in your trench for more than an hour after digging, professional drainage correction is likely necessary regardless of temporary fixes.
Q3: How do I know if a drainage problem is "temporary spring wetness" versus a permanent issue that needs professional grading?
A: This is the most important distinction you can make. Here is a simple at-home test: after three consecutive days of dry weather (no rain, temperatures above 10°C), walk your yard in the late afternoon. Press your heel into any area that previously held water. If water seeps up around your shoe, or if the ground feels spongy, you have a permanent drainage issue—not just spring runoff. If the ground feels firm and dry on top but damp an inch down, that is normal spring condition. A second test: dig a small hole (6 inches deep) in the problem area. If it fills with water from below (not from recent rain), you may have a high water table or a hidden spring. That requires professional assessment and likely a French drain or dry well—not a weekend DIY fix.
Q4: I want to use some of these temporary ideas, but I am worried about wasting money on materials I will throw away when my permanent landscaping happens.
A: A fair concern—but you likely will not be throwing anything away. Here is how to spend money on temporary projects that transition to permanent uses:
Temporary Project
How Materials Become Permanent
Gravel path (Project #5)
Becomes the base layer for your paver walkway
Raised garden beds (Project #3)
Stay exactly where they are, indefinitely
Dry creek (Project #4)
Most become permanent landscape features
Annual pots (Project #6)
Pots are reusable; composted plants become soil
Outdoor furniture (Project #8)
Moves to your finished patio
The only "wasted" money is if you buy materials that cannot be reused—cheap plastic edging, rubber mulch, or temporary concrete pads. Avoid those, and every dollar you spend now supports your permanent landscape. One insider tip: if you know your paver walkway will be 4 feet wide, buy your 3/4 crush gravel now and stockpile it on a tarp. You need it later anyway. You are not spending extra; you are buying ahead.
16. Conclusion: Your Yard Can Feel Finished This Weekend
Winnipeg's cold 2026 spring has delayed patios, concrete work, and major excavation for many homeowners. That is frustrating. But it is not a reason to abandon your yard until July.
The eight projects in this article:
Work in cool, damp conditions
Cost between
$100 and $400 (most under $200)
Can be completed in one to two weekends
Will not need to be torn out when your permanent hardscape arrives
Actually improve your site for future work
More importantly, they restore something valuable: the feeling that your yard is yours—not a construction zone you are tolerating.
If you would rather skip the DIY route and have a professional help you navigate this unusual spring, Sunshine Maintenance & Landscaping is here.
Unlike temporary landscaping fixes that some contractors treat as 'good enough,' we build for Winnipeg's extreme climate, every time. With over 30 years of local experience, full insurance, and a 'Best in Winnipeg' reputation, we do not cut corners on cold springs. We have completed hundreds of drainage corrections, retaining walls, and patios across this city. When we tell you a project should wait, we are saving you money. When we tell you it is ready, we guarantee it. Call us today and talk to a real Winnipeg landscaper who understands what your yard is going through—not a call centre or a subcontractor.
We can assess your property, recommend which temporary fixes make sense, and schedule your permanent hardscaping for when conditions are ideal.
To take the next step: call or text 204-229-9789 or click here to contact us today to arrange a “no obligation” introductory phone call and quote.
Request a quote today and let Sunshine help your yard recover from Winnipeg’s challenging spring 2026 season.

If Sunshine can help you, contact us to schedule a consultation:
Call or text Ray directly today: 204-229-9789
or email: ray.chastko@sunshinemaintenance.ca